


In my last post I did a small introduction on React, Facebook's latest JavaScript library for building user interfaces, and it's main differences with more complex MV* frameworks. Now it's time to use some React components inside a Rails application.
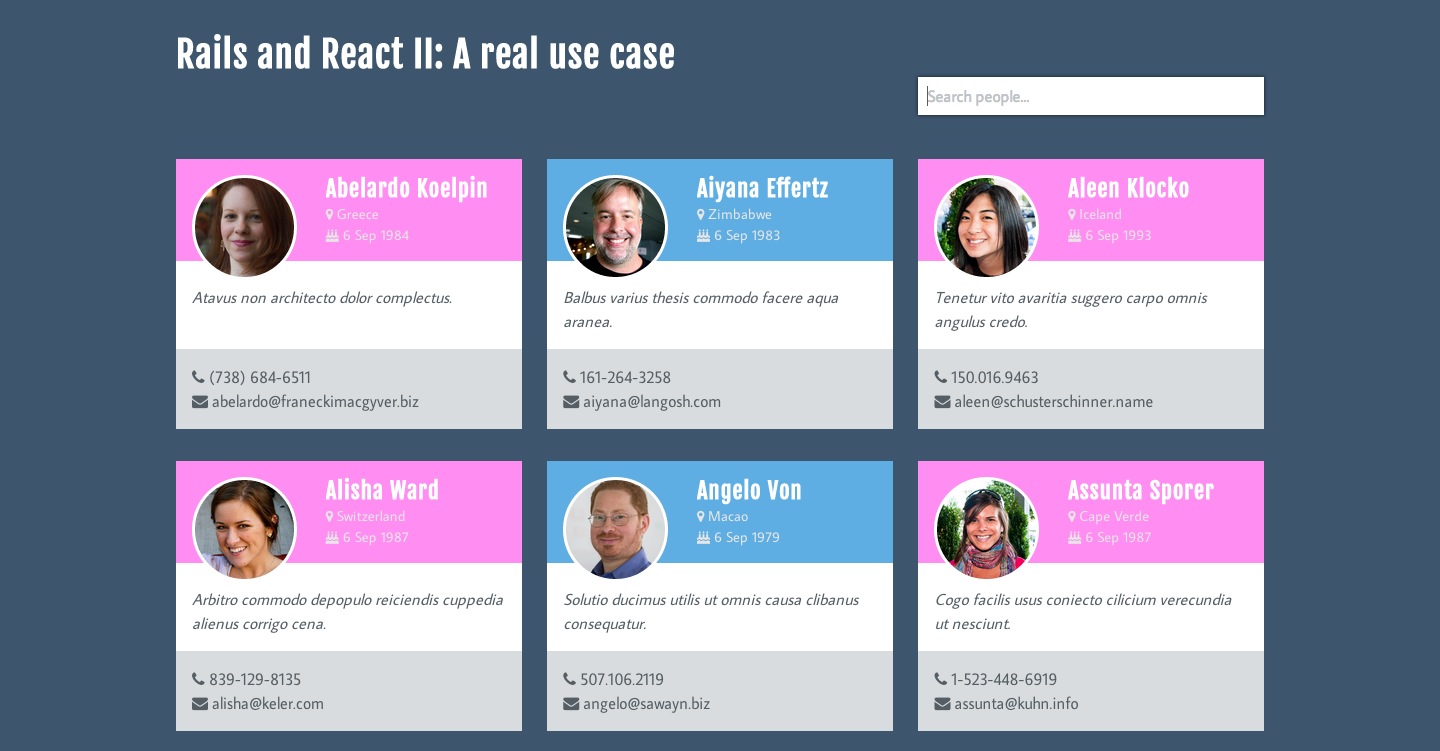
The final result
Before continuing, I will like to share a very simple application I have created as the result of what we are going to achieve after finishing this post. It consists of:
- A Person model.
- A HomeController with just one index action, the root route of the application and where the React components render and are in charge of creating search requests and displaying the results to the user.
- A PeopleController which just renders the JSON result of the requested searches.
It's built using Rails 4.2.0beta and PostgreSQL to take advantage of it's full-text search capabilities as described in another of my latests posts.
This is how it looks like:
Installing React
The easiest way to add React to a Rails project is adding this two gems to your Gemfile:
gem 'react-rails', github: 'reactjs/react-rails'
gem 'sprockets-coffee-react'- react-rails is React's official gem for Ruby. It adds the necessary assets to your project in order to use React and automatically transform your JSX into plain JavaScript.
- sprockets-coffee-react is a sprockets preprocessor which lets you write your components using CJSX (CoffeeScript with JSX markup).
To use React in an unobtrusive way, just add the following to your application.js.coffee:
...
#= require react
#= require react_ujs
This way all components created using the gem's view helper (we'll talk about it later on) will be automatically rendered and also destroyed on the page unload.
Now we are ready for some React fun.
Writing React components
We are going to use JSX to write our components as I mentioned before... but what's JSX? It's just a JavaScript XML syntax transformer. This means you can write XML-like syntax inside your components and it will be transformed to plain JavaScript function calls and objects. This is going to be a great help while coding the render method for each of our components. To learn more about JSX check out React's official docs.
A good tip for designing React components is to first code your views in plain ERB or HAML (in my case), and then extract every block of HTML you want to give extra functionality to a single component. This way you can use that HTML for the render method after all the design has been done. So lets get started!
The main view
As I mentioned before, we have a HomeController and it's index view. This is how the view looks like:
# app/views/home/index.html.haml

%section
  %header
    %h1 Rails and React II: A real use case

  = react_component 'PeopleSection', {}, :div
Here we're using react-rails's view helper to render the main PeopleSection component, passing no properties and wrapping it inside a div node. Easy as pie :)
The PeopleSection component
I have created all components in app/assets/javascripts/react so we have to require that tree in our main application.js.coffee file:
# app/assets/javascripts/react/application.js.coffee

...
#= require react
#= require react_ujs
...
#= require_tree ./react
PeopleSection is our main parent component, it has a the search box and the list of people, and it's the one in charge of requesting the necessary data to our back-end, provide that data to the people list and to listen to it's children events and react to them.
# app/assets/javascripts/react/people/people_section.js.coffee

# @cjsx React.DOM

@PeopleSection = React.createClass
  # Display name used for debugging
  displayName: 'PeopleSection'

  # Invoked before the component is mounted and provides the initial
  # state for the render method.
  getInitialState: ->
    # We'll change it to true once we fetch data
    didFetchData: false
    # The people JSON array used to display the cards in the view
    people: []

  # Invoked right after the component renders
  componentDidMount: ->
    # Lets fetch all the people...
    @_fetchPeople({})

  # AJAX call to our PeopleController
  _fetchPeople: (data)->
    $.ajax
      url: Routes.people_path()
      dataType: 'json'
      data: data
    .done @_fetchDataDone
    .fail @_fetchDataFail

  # If the AJAX call is successful...
  _fetchDataDone: (data, textStatus, jqXHR) ->
    # We change the state of the component. This will cause the component and
    # it's children to render again
    @setState
      didFetchData: true
      people: data

  # If errors in AJAX call...
  _fetchDataFail: (xhr, status, err) =>
    console.error @props.url, status, err.toString()

  # Handler for the submit event on the PeopleSearch component
  _handleOnSearchSubmit: (search) ->
    # Lets fetch some people by the user's input
    @_fetchPeople
      search: search

  # How the component is going to be rendered to the user depending on it's
  # props and state...
  render: ->
    # The collection of PersonCard components we are going to display
    # using the people stored in the component's state
    cardsNode = @state.people.map (person) ->
      # PersonCard component with a data property containing all the JSON
      # attributes we are going to use to display it to the user
      <PersonCard key={person.id} data={person}/>

    # HTML displayed if no people found in it's state
    noDataNode =
      <div className="warning">
        <span className="fa-stack">
          <i className="fa fa-meh-o fa-stack-2x"></i>
        </span>
        <h4>No people found...</h4>
      </div>

    # Here starts the render result
    <div>
      # This is the PeopleSearch component. When it triggers it's
      # onFormSubmit, the PeopleSection will handle it as seen
      # on it's _handleOnSearchSubmit method
      <PeopleSearch onFormSubmit={@_handleOnSearchSubmit}/>
      <div className="cards-wrapper">
        {
          # If there are people render the cards...
          if @state.people.length > 0
            {cardsNode}
          # If has fetched data and no people found, render the
          # warning message instead
          else if @state.didFetchData
            {noDataNode}
        }
      </div>
    </div>
The # @cjsx React.DOM comment at the beginning of the file is required on every component to tell Rails we are using JSX so it compiles it to JavaScript. As you can see the way it works is very simple:
- We set an initial state, so the component renders fine to the user.
- When the component renders for the first time we fetch the people we are going to display.
- If everything goes fine we change it's state forcing the component and it's children to render again.
- Remember that React uses it's virtual DOM for this, so it does not renders the whole HTML again. It just applies the differences found if needed, so it's really fast.
The PeopleSearch component
As we have seen earlier this component triggers an event which makes the PeopleSection component create an AJAX call to our back-end. Let's take a closer look at how it works:
# app/assets/javascripts/react/people/people_search.js.coffee

# @cjsx React.DOM

@PeopleSearch = React.createClass
  displayName: 'PeopleSearch'

  # Submit handler
  _handleOnSubmit: (e) ->
    e.preventDefault()

    # the value of the search box input
    searchValue = @refs.search.getDOMNode().value.trim()

    # triggers it's custom onFormSubmit event passing searchValue
    @props.onFormSubmit(searchValue)

  render: ->
    <div className="filter-wrapper">
      <div className="form-wrapper">
        <form onSubmit={@_handleOnSubmit}>
          # ref attribute is used to reference elements in the
          # component by @refs
          <input ref="search" placeholder="Search people..." type="search"/>
        </form>
      </div>
    </div>
This is a very simple component. When it's form is submitted, it triggers the onFormSubmit passing the search input value. And that's it.
The PersonCard component
Our last but not least component is the PersonCard. It will in charge of rendering a Person.
# app/assets/javascripts/react/people/person_card.js.coffee
# @cjsx React.DOM
@PersonCard = React.createClass
displayName: 'PersonCard'
render: ->
# let's use this add-on to set the main div's class names
cx = React.addons.classSet
# it will apply every key which value equals true
# to the className attribute
cardClasses = cx
'card': true
'female': @props.data.gender == 'female'
'male': @props.data.gender == 'male'
# here we use the calculated classes
<div className={cardClasses}>
<header>
<div className="avatar-wrapper">
<img className="avatar" src={@props.data.picture} />
</div>
<div className="info-wrapper">
<h4>{@props.data.first_name} {@props.data.last_name}</h4>
<ul className="meta">
<li>
<i className="fa fa-map-marker"></i> {@props.data.location}
</li>
<li>
<i className="fa fa-birthday-cake"></i> {@props.data.birth_date}
</li>
</ul>
</div>
</header>
<div className="card-body">
<div className="headline">
<p>{@props.data.headline}</p>
</div>
<ul className="contact-info">
<li><i className="fa fa-phone"></i> {@props.data.phone_number}</li>
<li><i className="fa fa-envelope"></i> {@props.data.email}</li>
</ul>
</div>
</div>
This is the most simple component of all three. I uses the props.data passed by the PeopleSection to display them on it's render method. As we are going to use a React add-on to set the className attribute, don't forget to add this to your application.rb, otherwise it just won't work:
# config/application.rb
module RailsAndReact
  class Application < Rails::Application
    # ...
    # React config
    config.react.addons = true
    # ...
  end
end
What's next?
In just some minutes I have created some simple React components which fit really nice with the good parts of a Rails application. As you can create really small components, the difficulty of coding them decreases also very much, so learning how to use React is very easy.
In the next post we will create more complex components and we will see how different components communicate between each other. Meanwhile take a look to the live demo and to the source code:
Happy coding!